The directory app
Our next example is very similar to assignment two. Once again, we are going to build an app that allows users to build simple directories. In this initial version we will store the directories locally on the user's device. In a later version we will instead be back to storing the directories on our back end server.
In this example we will get some more experience working with navigation between screens, and we will also take a closer look at techniques for displaying and managing lists of items. Behind this scenes, this example will also be our first exposure to the use of model classes, which is an architectural feature of apps that we will be using extensively in future examples.
The user interface for our app will be very similar to the user interface you set up in assignment two. The first screen will display the user's directory.
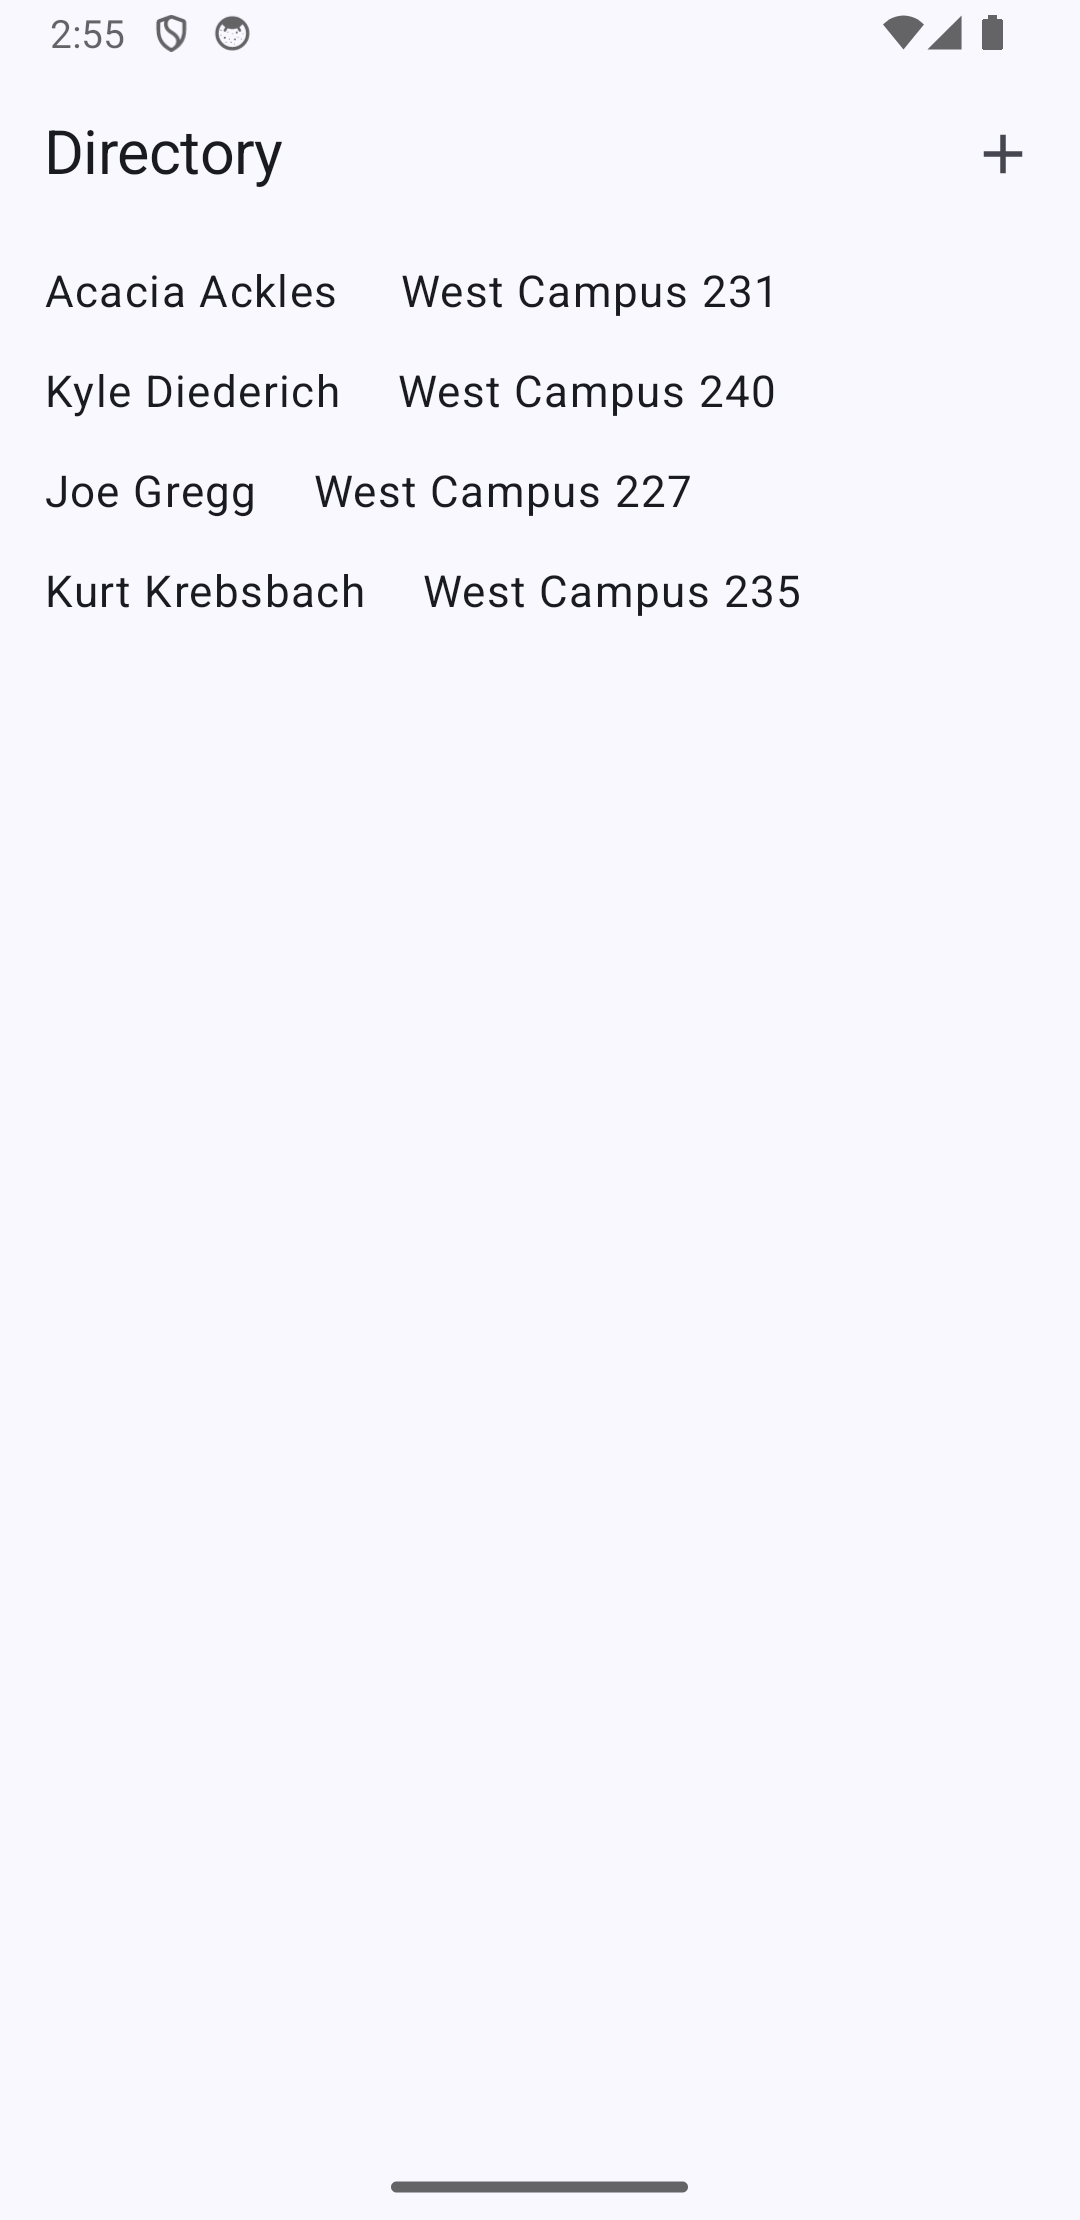
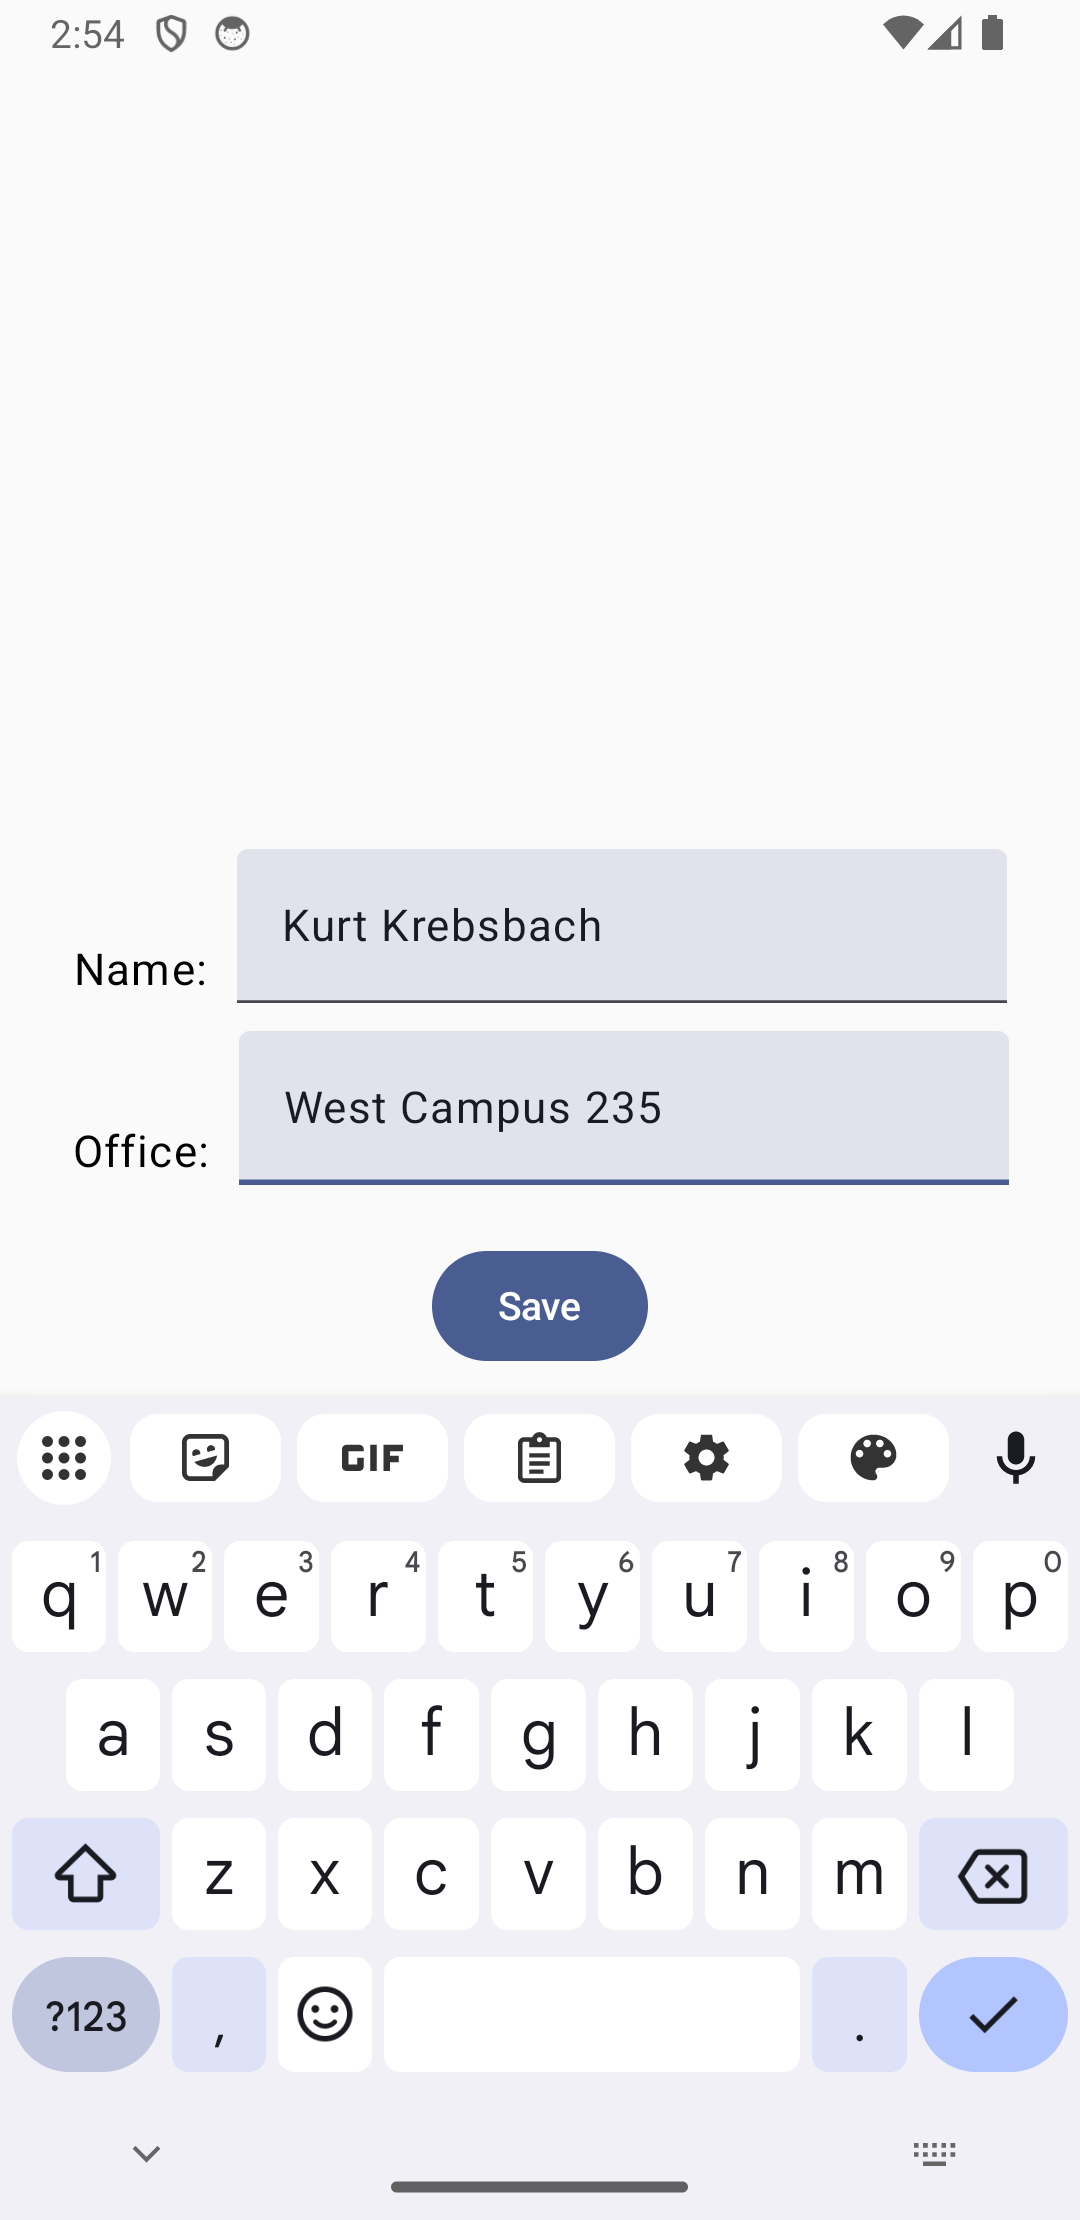
Clicking the + button in the navigation bar takes the user to a second screen where they can enter details for a new person.
Data class
The primary data for this application is a list of Person objects.
package edu.lawrence.androiddirectory

import java.util.UUID

data class Person(
    val id : UUID = UUID.randomUUID(),
    val name: String,
    val office : String)
The DirectoryApp component
The top level component in our application is the DirectoryApp:
@Composable
fun DirectoryApp(initialList : List<Person>,modifier: Modifier) {
    val people = remember { initialList.toMutableStateList() }
    val context = LocalContext.current
    val navController = rememberNavController()
    fun saveChanges() {
        val gson = Gson()
        val json : String = gson.toJson(people)
        try {
            context.openFileOutput("people.json", MODE_PRIVATE).use { fos ->
                fos.write(json.toByteArray())
            }
        } catch( e : IOException) {
            e.printStackTrace()
        }
    }
    fun createPerson(name: String,office: String) : Unit {
        val newPerson = Person(name = name,office = office)
        people.add(newPerson)
        navController.navigate("list")
        saveChanges()
    }
    fun removePerson(person : Person) {
        people.remove(person)
        saveChanges()
    }
    NavHost(navController,startDestination="list") {
        composable(route="list") {
            ListScreen(people = people,doRemove = {person->removePerson(person)},toCreate = { navController.navigate("create") },modifier = modifier)
        }
        composable(route="create") {
           CreateScreen(onSave = {name,office -> createPerson(name,office)}, modifier = modifier)
        }
    }
}
The first thing to note about this class is the people state variable. This is where we will store the list of Person objects. This is the primary state variable for the entire application.
Another important aspect of this version of the program is that we will not be using a back end, instead all of the data for this app will be stored locally in a file on the user's phone.
Since the people list is so important, this component also includes a set of local functions that will help us to perform important operations on the list, such as saving the list to the file, adding new people, and removing people from the directory.
One detail that we don't handle directly in this class is setting up the initial list of people to work with. That list will get passed to the DirectoryApp component in a parameter. Here is the code that is responsible for setting up the initial list and launching the app:
class MainActivity : ComponentActivity() {
    override fun onCreate(savedInstanceState: Bundle?) {
        super.onCreate(savedInstanceState)
        enableEdgeToEdge()
        var  initialList : List<Person>
        try {
            val json = openFileInput("people.json").bufferedReader().use { it.readText() }
            val sType = object : TypeToken<List<Person>>() { }.type
            initialList = Gson().fromJson<List<Person>>(json, sType)
        } catch (e: IOException) {
            initialList = listOf(Person(name = "Acacia Ackles",office ="Steitz 131"),
                Person(name = "Joe Gregg",office = "Briggs 413"),
                Person(name = "Kurt Krebsbach",office ="Briggs 411"))
        }

        setContent {
            AndroidDirectoryTheme {
                DirectoryApp(initialList = initialList,modifier = Modifier.fillMaxSize())
            }
        }
    }
}
To save our data to a local file we will be converting the list of Person objects into JSON, and then just saving that JSON code in a simple text file named 'people.json'. In the code above you can see how we read the list of people from the file, while the saveChanges() function in the DirectoryApp component demonstrates how to save the list of people out to the same file.
Another important thing to note in the DirectoryApp component is the navigation structure being set up there. We follow the usual approach of using a NavHost() component with separate routes for each screen in our application.
We will set up separate components for each of the two screens in the app.
The ListScreen component
The first screen the user will see when the app launches is the screen that displays the directory list.
@OptIn(ExperimentalMaterial3Api::class)
@Composable
fun ListScreen(people : List<Person>, doRemove : (Person)->Unit,toCreate : ()->Unit,modifier: Modifier) {
    Scaffold(topBar = {
        TopAppBar(
            title = {
                Text(
                    "Directory",
                )
            },
            actions = {
                IconButton(onClick = { toCreate() }) {
                    Icon(
                        imageVector = Icons.Default.Add,
                        contentDescription = "Add Person"
                    )
                }
            },
        )
    },
        modifier = Modifier.fillMaxSize())
    { innerPadding ->
        Column(verticalArrangement = Arrangement.Top, modifier = Modifier.fillMaxSize().padding(innerPadding)) {
            people.forEach { person ->
                key(person.id) {
                  PersonItem(person = person,onRemove = doRemove)
                }
           }
        }
    }
}
This component sets up the screen by using a Scaffold. Since we are going to be doing some navigation in this app we need to make sure that the screen comes equipped with a top bar that has a navigation button that can take us to the second screen. You can see the code for setting up the top bar embedded in the code for the Scaffold component. A top bar typically displays a title and one or more action buttons. In this case, we need to set up a single action button that will navigate us to the second screen.
An important thing to note here is that the actual navigation structure got set up in the component above this one, the DirectoryApp. If we want to do some navigation, we have to have some way to tell the DirectoryApp to that navigation for us. The way this gets handled is that the DirectoryApp will set up a special callback function that does the navigation to the second screen and then pass us that callback function as a parameter, the toCreate parameter. All we have to do then is to attach a lambda expression to the action button that calls that callback function - that function in turn will handle the navigation to the second screen.
The content area of the Scaffold is a simple Column component that will display the list of people. An important feature to note here is the use of the key() component to wrap each item in the Column. This is necessary to make the swipe-to-delete mechanism work correctly with our column. The key() component assigns a unique key to each item in the column. Fortunately, I have already equipped the Person class with a unique id for each Person I create, so that makes the perfect candidate for a unique key for each person we display.
The PersonItem component
Each Person in the people list will get displayed via the use of a custom PersonItem component:
@OptIn(ExperimentalMaterial3Api::class)
@Composable
fun PersonItem(
    person : Person,
    onRemove: (Person) -> Unit
) {
    val dismissState = rememberSwipeToDismissBoxState(
        confirmValueChange = {
            if(it == SwipeToDismissBoxValue.EndToStart) {
                onRemove(person)
                return@rememberSwipeToDismissBoxState true
            }
            return@rememberSwipeToDismissBoxState false
        },
        positionalThreshold = { it * .33f }
    )
    SwipeToDismissBox(
        state = dismissState,
        modifier = Modifier.fillMaxWidth().wrapContentHeight(),
        backgroundContent = { DismissBackground(dismissState) },
        content = {
            Row(modifier = Modifier
                .fillMaxWidth()
                .background(MaterialTheme.colorScheme.background)
                .padding(horizontal = 16.dp,vertical=6.dp)) {
                Text(person.name)
                Spacer(modifier=Modifier.width(20.dp))
                Text(person.office)
            }
        })
}

@OptIn(ExperimentalMaterial3Api::class)
@Composable
fun DismissBackground(dismissState: SwipeToDismissBoxState) {
    val color = if (dismissState.dismissDirection == SwipeToDismissBoxValue.EndToStart) {
        Color.Red
    } else Color.Transparent

    Box(
        modifier = Modifier
            .fillMaxWidth()
            .background(color)
            .padding(top=4.dp,bottom=4.dp,end=6.dp),
        contentAlignment = Alignment.CenterEnd
    ) {
        Icon(
            imageVector = Icons.Default.Delete,
            contentDescription = null,
            tint = Color.White
        )
    }
}
In its most basic form, a PersonItem can be implemented simply as a Row that displays a Text component with the person's name, a Spacer, and a Text component to display the person's office.
The reason that the code for this component is so complex is that I also wanted to implement another common feature that you will see in lists, a swipe to delete feature. I want users to be able to remove entries from the directory via a swipe to delete gesture. To implement that feature in Jetpack Compose will have to use a special component here, a SwipeToDismissBox. That component in turn also requires us to set up a separate DismissBackground component that gets revealed when the user swipes a list entry to the left to start the deletion process.
One final thing that the SwipeToDismissBox will need is some code to call when the user completes the gesture. If you look closely at the code above you will see a call to the onRemove() function at a key point in the structure we set up. Since we are sitting in the PersonItem component, someone will need to pass us that onRemove() function that we can invoke to do the removal. If you look at the code for the ListScreen component you will see that that component gets passed a function from the DirectoryApp that it then passes along to each PersonItem for use as a remove person function.
The CreateScreen component
One final component we will need for this app is a component to implement the second screen in the app.
@Composable
fun CreateScreen(onSave : (String,String)->Unit, modifier : Modifier) {
    val focusManager = LocalFocusManager.current
    val name = remember { mutableStateOf("") }
    val office = remember { mutableStateOf("") }

    Column(verticalArrangement = Arrangement.Center,horizontalAlignment = Alignment.CenterHorizontally, modifier = modifier.fillMaxSize().padding(10.dp)) {
        Row(horizontalArrangement = Arrangement.Start, verticalAlignment = Alignment.Bottom) {
            Text("Name:")
            Spacer(modifier=Modifier.width(10.dp))
            TextField(value = name.value,
                onValueChange = {newValue : String -> name.value = newValue},
                keyboardOptions = KeyboardOptions(imeAction = ImeAction.Done),
                keyboardActions = KeyboardActions(
                    onDone = { focusManager.clearFocus() })
            )
        }
        Spacer(modifier=Modifier.height(10.dp))
        Row(horizontalArrangement = Arrangement.Start, verticalAlignment = Alignment.Bottom) {
        Text("Office:")
        Spacer(modifier=Modifier.width(10.dp))
        TextField(value = office.value,
            onValueChange = {newValue : String -> office.value = newValue},
            keyboardOptions = KeyboardOptions(imeAction = ImeAction.Done),
            keyboardActions = KeyboardActions(
                onDone = { focusManager.clearFocus() })
        )
    }
        Spacer(modifier=Modifier.height(20.dp))
        Button(onClick = {onSave(name.value,office.value)}) {
                Text("Save")
        }
    }
}
This screen is basically a form that the user can fill in to create a new directory entry. The form is backed by a couple of state variables, name and office, which in turn are linked to TextFields where the user can enter that information. At the bottom of the form is a 'Save' button that the user can click to save the new person in the directory and also navigate back to the first screen.
The onSave() function that handles all of this will get passed to us from the DirectoryApp. If you go back and look at the code for the DirectoryApp component you will see how that callback function gets set up.