The directory app
Our next example is a simple app designed to store a directory for a group of people in a department. The app stores a list of people where each person has a name and an office.
In this example we will get some more experience working with navigation between screens, and we will also take a closer look at techniques for displaying and managing lists of items. Behind this scenes, this example will also be our first exposure to the use of model classes, which is an architectural feature of apps that we will be using extensively in future examples.
The first view in the app displays the directory.
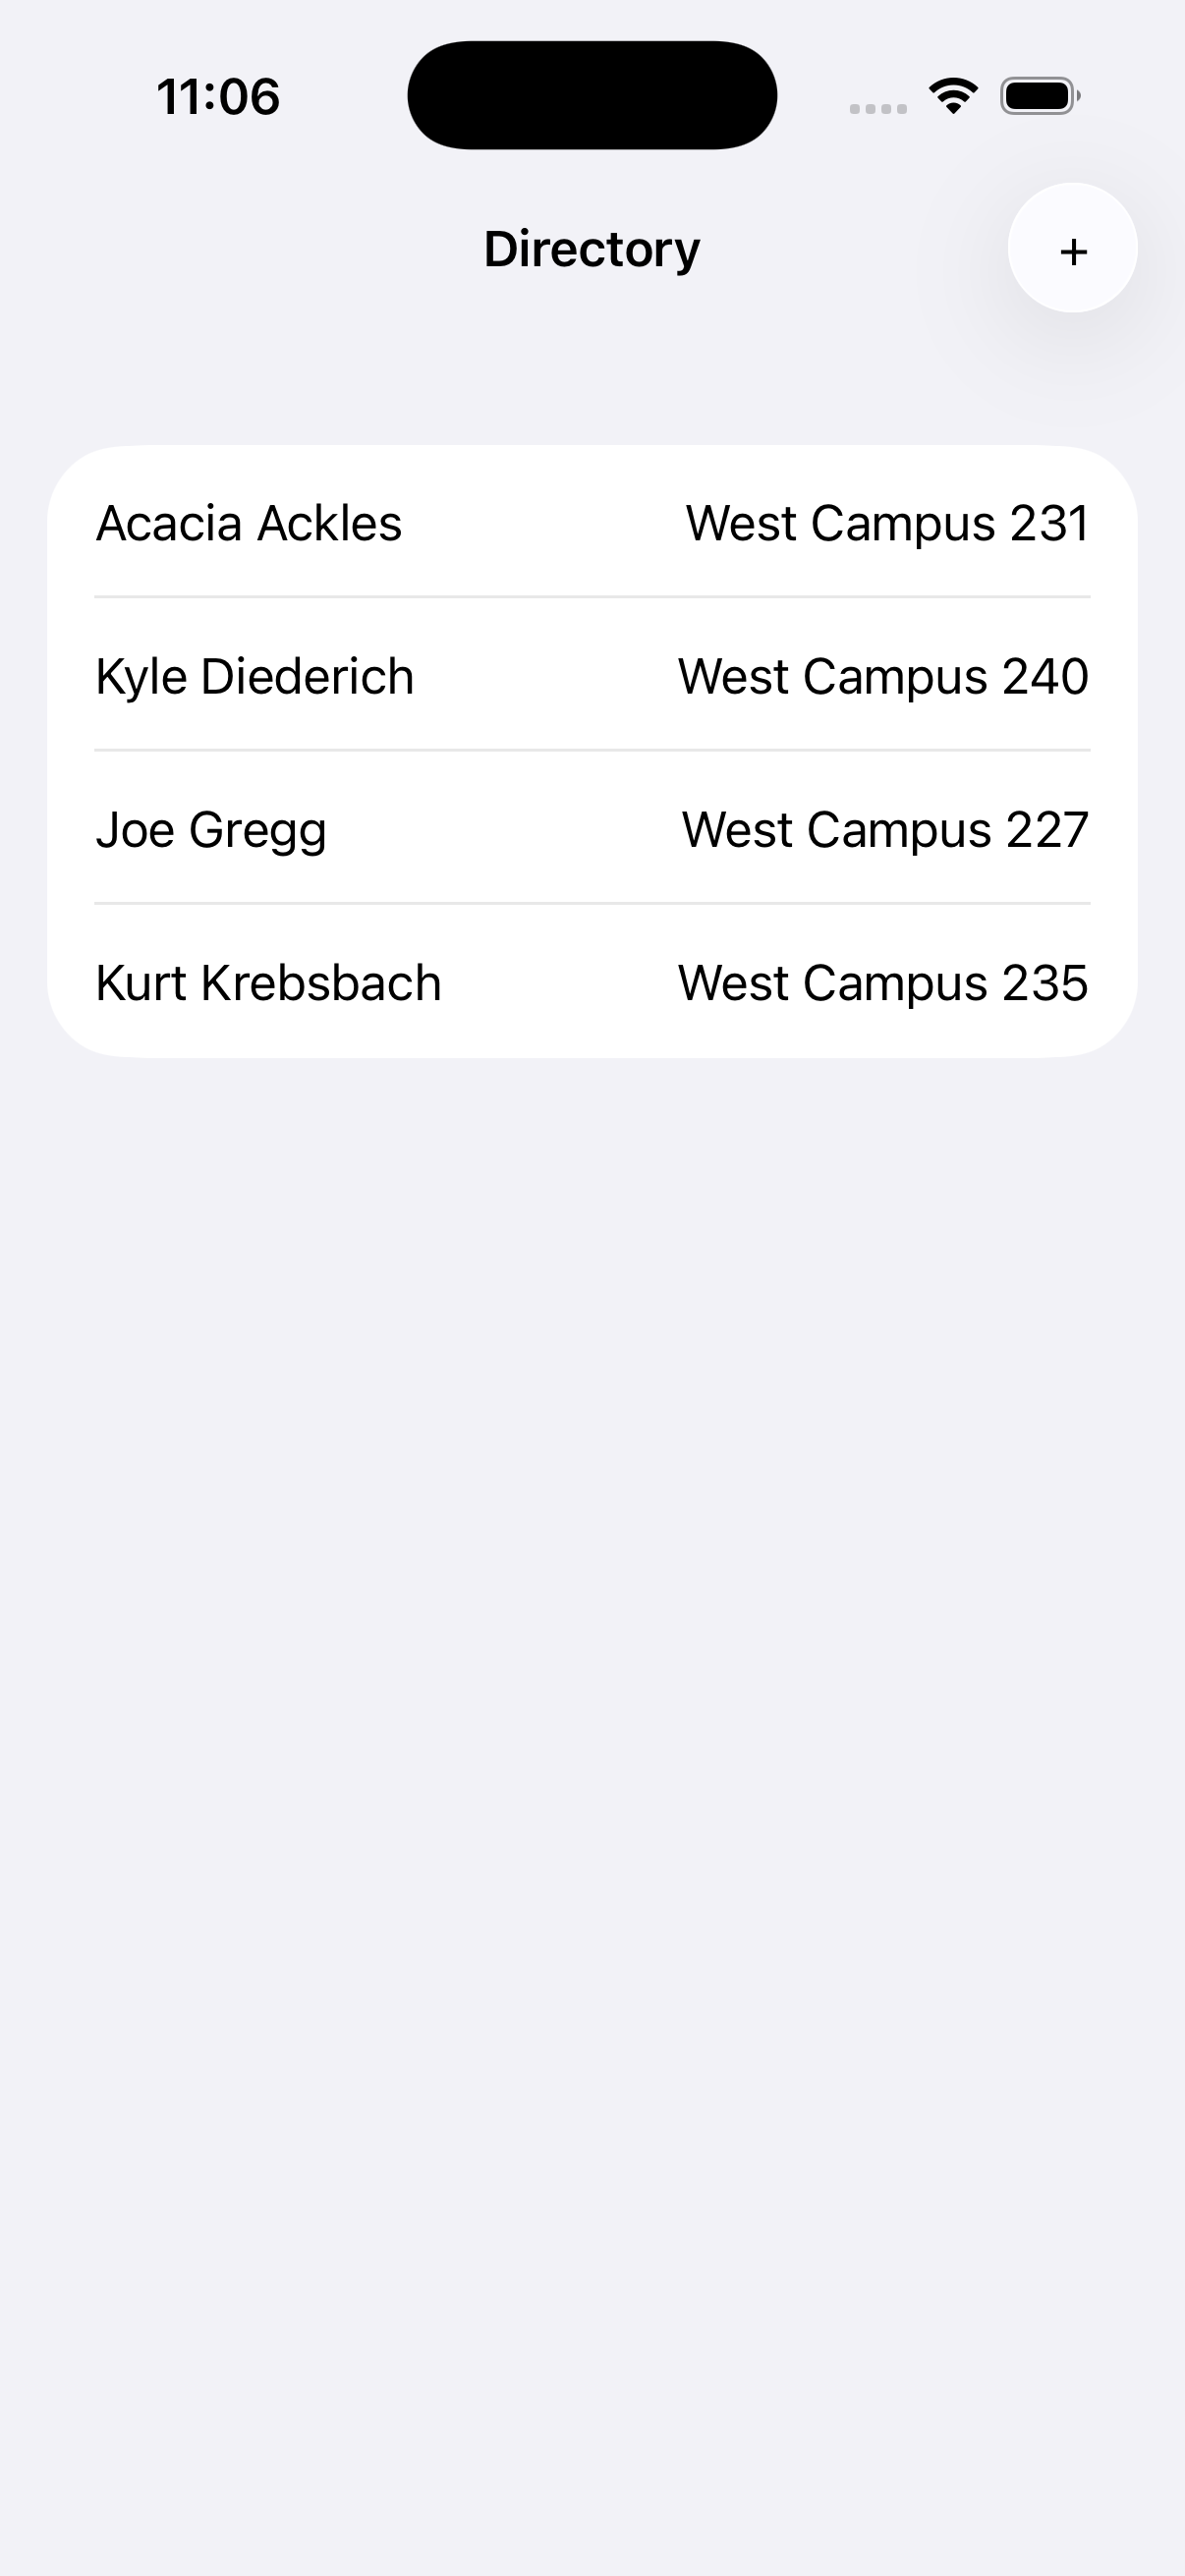
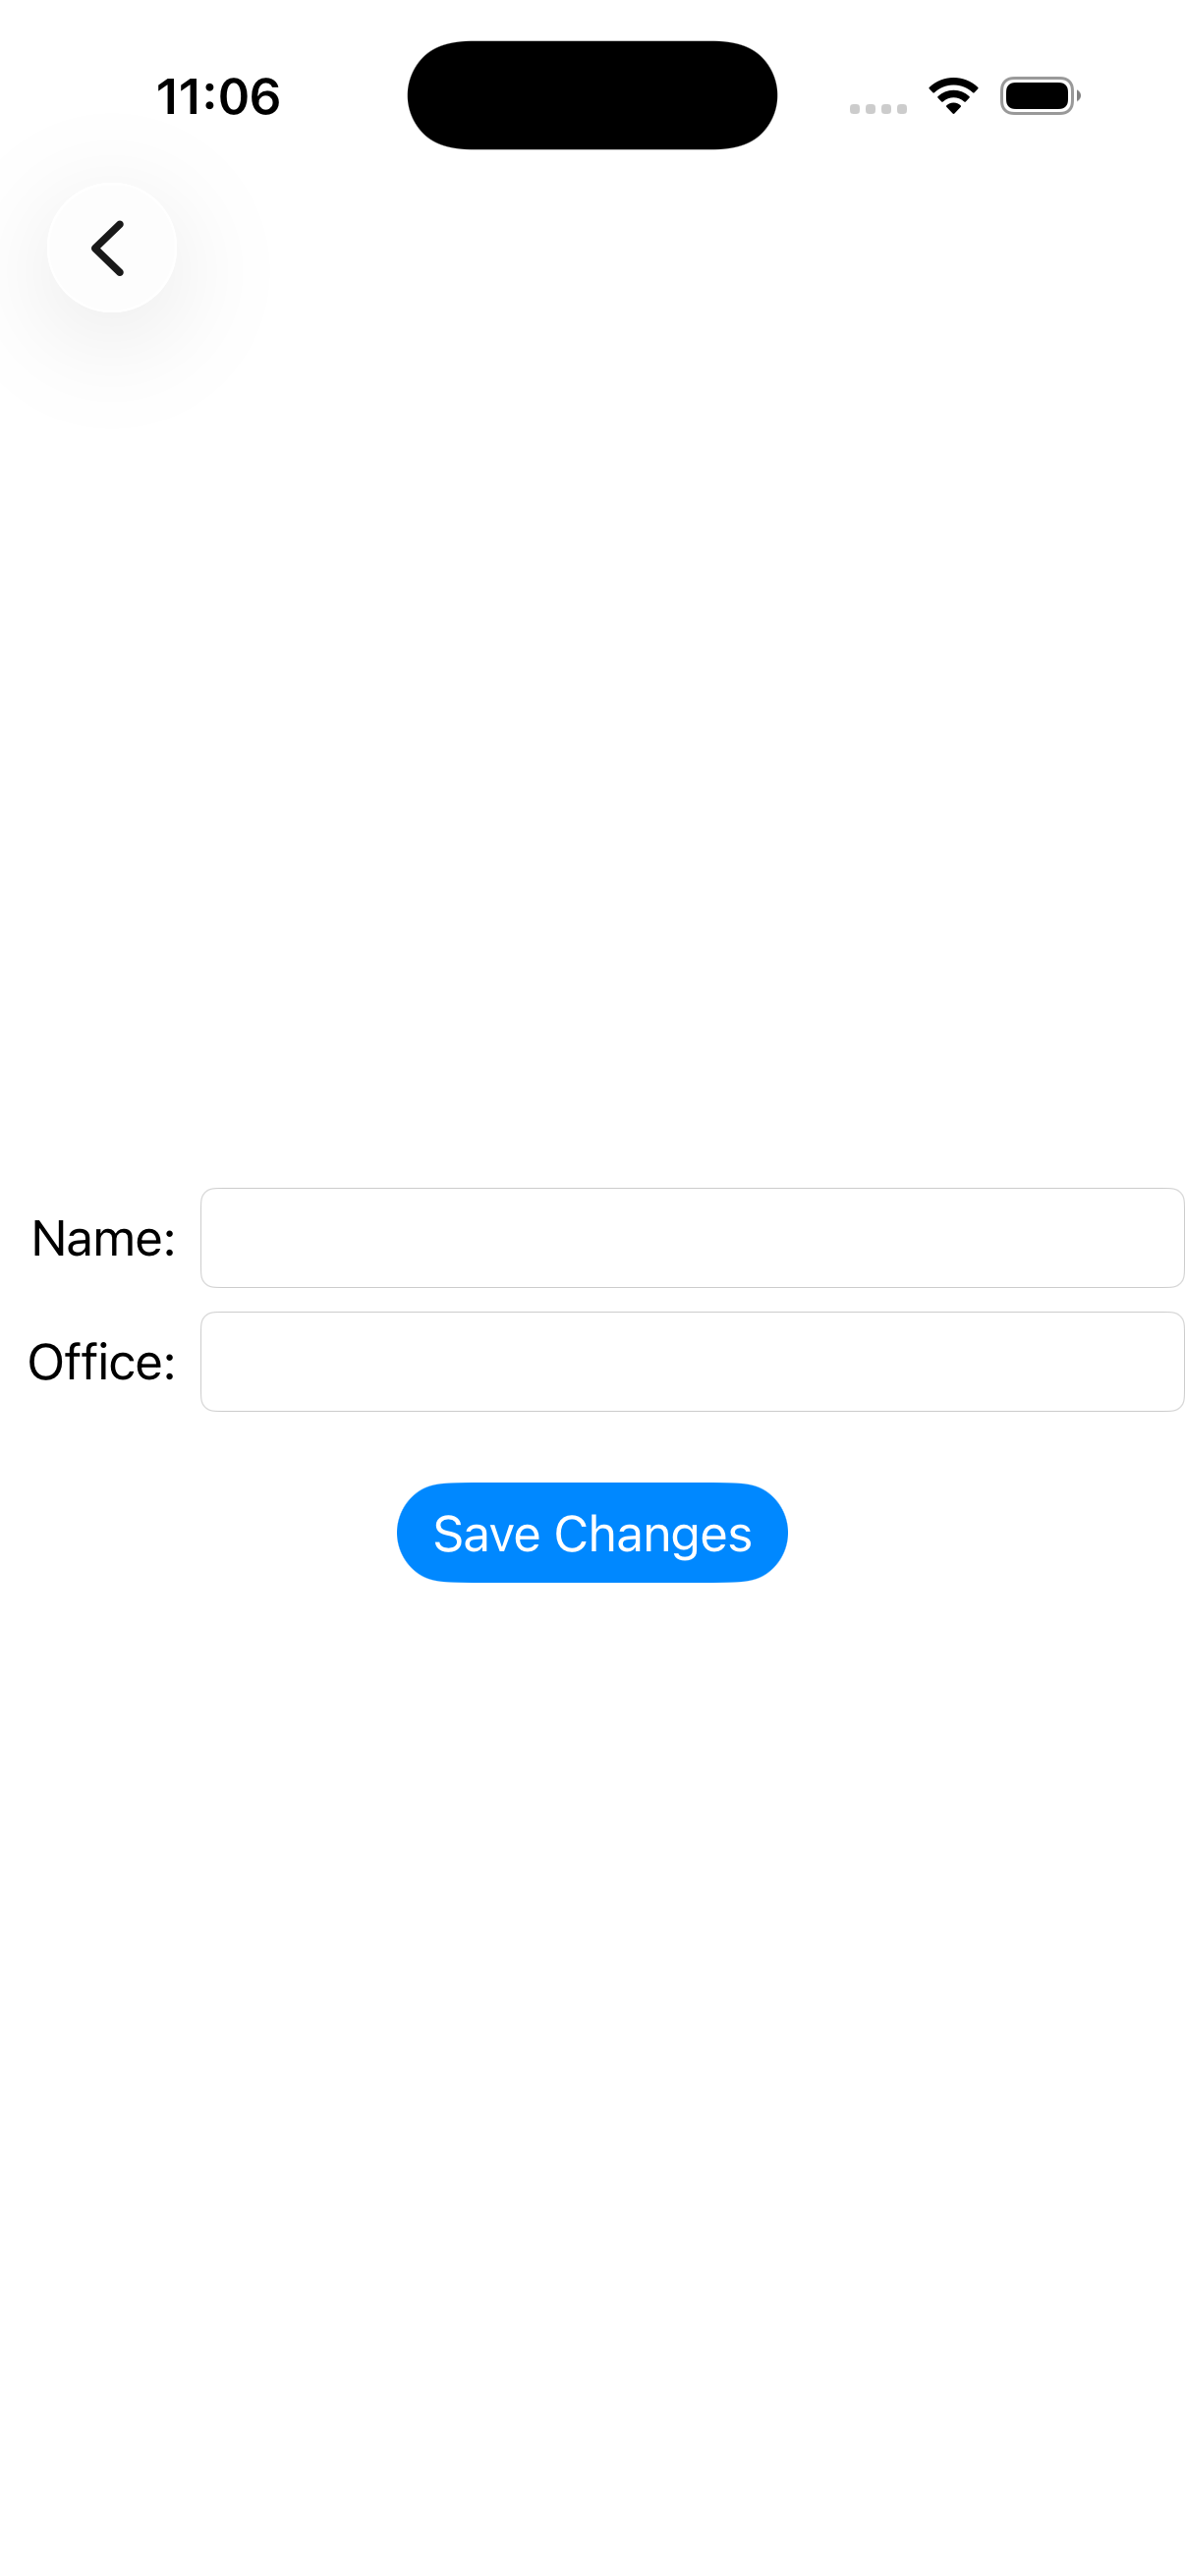
Clicking the + button in the navigation bar takes the user to a second view where they can enter details for a new person.
Data class
This application will maintain a directory of people that will get stored in a local file.
Individual entries in the directory are represented by Person objects.
class Person : Codable, Identifiable {
    var id = UUID()
    var name : String
    var office : String

    init(name n: String,office o: String) {
        name = n;
        office = o;
    }
}
One very important detail here is the fact that we are using class to declare this class instead of the usual struct. Swift allows us to set up classes either by using struct or class. The important distinction between these two forms is that classes declared with struct are pass by value objects, while classes declared with class are always handled via pass by reference. This has subtle and important consequences for our code. The one place where this distinction is important is in the process for making a new person. To make a new Person we will start by making an initial object with an empty name and an empty address. We then append that new Person object to the list of people we are storing. If we had used struct to declare the Person class the call to the append() method that puts this new Person on the list of people would pass this new Person by value, which would result in a copy of our empty Person being placed on the list. On the other hand, if we declare the Person class with class, the append() method instead places a reference to the newly created Person on the list. If the user subsequently provides a name and an office for our new Person, those changes will automatically apply to the new Person at the end of the list of people, since the list will be storing a reference to the new Person.
Another consequence of using class here is that we are now obligated to provide an explicit construtor for our class. That constructor is the init() method you see above.
To make it possible to display Person objects in a SwiftUI list, we need to meet the requirement that each object have a unique id. We meet this requirement by having our Person class implement the Identifiable protocol and by giving our Person class an id property. The UUID() function generates a unique identifier for each person on demand.
The data model class for our application is the Directory class. A Directory stores a list of Person objects and includes methods for reading and writing the app's data to a file. More specifically, we will be using a special type of file called a property list file to store the data, because Swift offers pretty good support for this file type.
class Directory : ObservableObject {
    @Published var people : [Person]
    @Published var newPerson : Person = Person(name:"",office:"")

    let itemArchiveURL: URL = {
        let documentsDirectories =
            FileManager.default.urls(for: .documentDirectory, in: .userDomainMask)
        let documentDirectory = documentsDirectories.first!
        return documentDirectory.appendingPathComponent("directory.plist")
    }()

    init() {
        do {
            let data = try Data(contentsOf: itemArchiveURL)
            let unarchiver = PropertyListDecoder()
            let loc = try unarchiver.decode(Array<Person>.self, from: data)
            people =  loc
        } catch {
            people =
            [Person(name:"Acacia Ackles",office:"West Campus 231"),
             Person(name:"Kyle Diederich",office: "West Campus 240"),
             Person(name:"Joe Gregg",office:"West Campus 227"),
             Person(name:"Kurt Krebsbach",office:"West Campus 235")]
        }
    }

    func makeNewPerson() {
        newPerson = Person(name:"",office:"")
        people.append(newPerson)
    }

    func delete(at offsets: IndexSet) {
        people.remove(atOffsets: offsets)
    }

    func saveChanges() {
        do {
            let encoder = PropertyListEncoder()
            let data = try encoder.encode(people)
            try data.write(to: itemArchiveURL)
        } catch {
        }
    }
}
Among other things, this class contains code for saving a list of Person objects to a property list file and reading those objects back from the file later. The first step in doing this is to set up a special URL that points to the file. You can see the code for setting up that URL in initializer for the itemArchiveURL property. Every app in iOS has associated with it a private storage space. In that private space there is a documents directory. The code here starts by getting a URL that points into that documents directory, and then appending the name of the file we want to use, 'directory.plist'. The plist extension identifies this file as a property list file.
The init() method above, which will get called automatically when we create new Directory object, contains code that will try to open the directory.plist file as a Data object and then pass that Data object to a special PropertyListDecoder object that will take the contents of the Data object and turn it into an array of Person objects. For this process to work correctly we needed the Person class to implement the Codable interface.
If we are running the app for the first time there will be no directory.plist file and the code to open it will fail with an exception. To handle this I placed the file reading code in a do/catch block. In case of an exception in the file reading process the catch block contains code to create some sample data for us to work with.
Also here is a saveChanges() method that can save our list of people back out to the file. This is similar to the reading code, but uses a PropertyListEncoder to convert our data to the right format for saving.
Working with the data model class
In examples up to this point we have seen that views make use of @State variables. A special characteristic of @State variables is that they automatically watch for changes. Changing the value of a @State variable causes the view containing the variable to be redrawn.
When we place our Directory data model object in a view we will no longer be using @State with the property that stores this object. Instead, we are going to use an alternative approach:
- We start by making the Directory class implement the ObservableObject protocol.
- ObservableObject classes include one or more properties tagged with
@Published. Like@Stateproperties,@Publishedproperties are observed by SwiftUI. Changes to@Publishedproperties will trigger redraws of views that depend on them. - When we store an ObservableObject as a property in a view, we will tag that property with either the
@ObservedObjector@StateObjectproperty wrappers. This tells SwiftUI that the object in question contains@Publishedproperties that the system needs to watch for changes.
The first view
Here is the code for the first view in the app. This view sets up the navigation controller and the first view displayed in that controller. That first view displays the list of people in our directory.
struct ContentView: View {
    @StateObject var directory : Directory = Directory()
    @State var isShowingDetailView = false

    var body: some View {
        NavigationStack {
            VStack {
                List {
                    ForEach(directory.people) { p in
                        HStack {
                            Text(p.name)
                            Spacer()
                            Text(p.office)
                        }
                    }.onDelete(perform:delete)
                }
            }.navigationDestination(isPresented: $isShowingDetailView, destination: {PersonView(d:directory)})
            .navigationTitle("Directory")
            .navigationBarTitleDisplayMode(.inline)
            .navigationBarItems(trailing: Button("+"){
                directory.makeNewPerson()
                isShowingDetailView = true;
            }
            )
        }
    }

    func delete(at offsets: IndexSet) {
        directory.delete(at:offsets)
        directory.saveChanges()
    }
}
Here we have stored our model object in the directory property.
Programmatic navigation
To create a new entry in the directory the user will click the + button in the navigation bar. Normally we would use a NavigationLink to implement the + button. In this case we use a button instead. The reason for this is that a NavigationLink simply moves you to a new view: if you need to perform additional actions before doing the navigation you will need a button's action closure to do that.
To implement the navigation action in the + button we use this strategy.
- We start by attaching a navigationDestination() to our main view. Specifically, we make this a conditional navigation destination that will only fire once the
isShowingDetailViewproperty switches to true. Thedestination:parameter sets up the navigation to the second view. - We also attach a navigationBarItems() modifier to our view to set up the navigation bar. In this we set up a trailing item which is a button. The action closure for this button switches isShowingDetailView to true, which will in turn cause the navigationDestination() to fire and take us to the second view.
- We have to use this more complicated arrangement because we need to be able to tell the Directory to make a new Person right before we trigger the navigation. We can slip code into the Button's closure that does that for us.
A little more about lists
The primary purpose of this first view is to display a list of Person objects. Inside the directory object there is a published property, people, that contains the list of Person objects. In our user interface we set up a List() component whose body closure contains a ForEach() expression designed to display all of the Person objects in directory.people. Specifically, for each Person p in the list we will make an HStack that displays that person's name, a spacer, and that person's office.
Another feature that this view demonstrates is the delete gesture for list items. In the code that sets up the list items I have used the onDelete(perform:) modifer. The onDelete event gets triggered when the user swipes left on a list entry to request to delete it. This will call our view's delete() method when the user asks to delete a list item.
The second view
The second view allows the user to enter the details for a new person they have just created.
struct PersonView: View {
    @StateObject var d : Directory

    var body: some View {
        VStack {
            HStack {
                Text("Name:").frame(width:60,height:20,alignment: .trailing)
                TextField("",text:$d.newPerson.name).textFieldStyle(.roundedBorder)
            }
            HStack {
                Text("Office:").frame(width:60,height:20,alignment: .trailing)
                TextField("",text:$d.newPerson.office).textFieldStyle(.roundedBorder)
            }
            Button("Save Changes"){
                d.saveChanges()
            }.buttonStyle(.borderedProminent).padding()
        }
    }
}
The code for the + button in the first view calls the Directory's makeNewPerson() method. This creates a new Person object and stores that new Person in the Directory's newPerson property for easy access. This second view will access that newPerson property and link its name and office properties to the two text fields where the user can enter that data.
The second view also includes a 'Save Changes' button. Clicking this will invoke the Directory's saveChanges() method, which saves the full list of Person objects stored in the Directory out to the property list file.
Because we are displaying this second view in the context of a NavigationStack that was set up by the first view we will get access to a convenient navigation feature. Without us having to set it up, we will get a NavigationLink in the navigation bar for the second view that says 'Directory'. Clicking this will take the user back to the first view.