Implementing the full app
In this second set of lecture notes on the graph drawing program I am going to complete the drawing app. The final version of the app will be designed to run on an iPad, so this will also give us an opportunity to look at some design strategies that are best suited for tablets.
Here is what the finished app will look like:
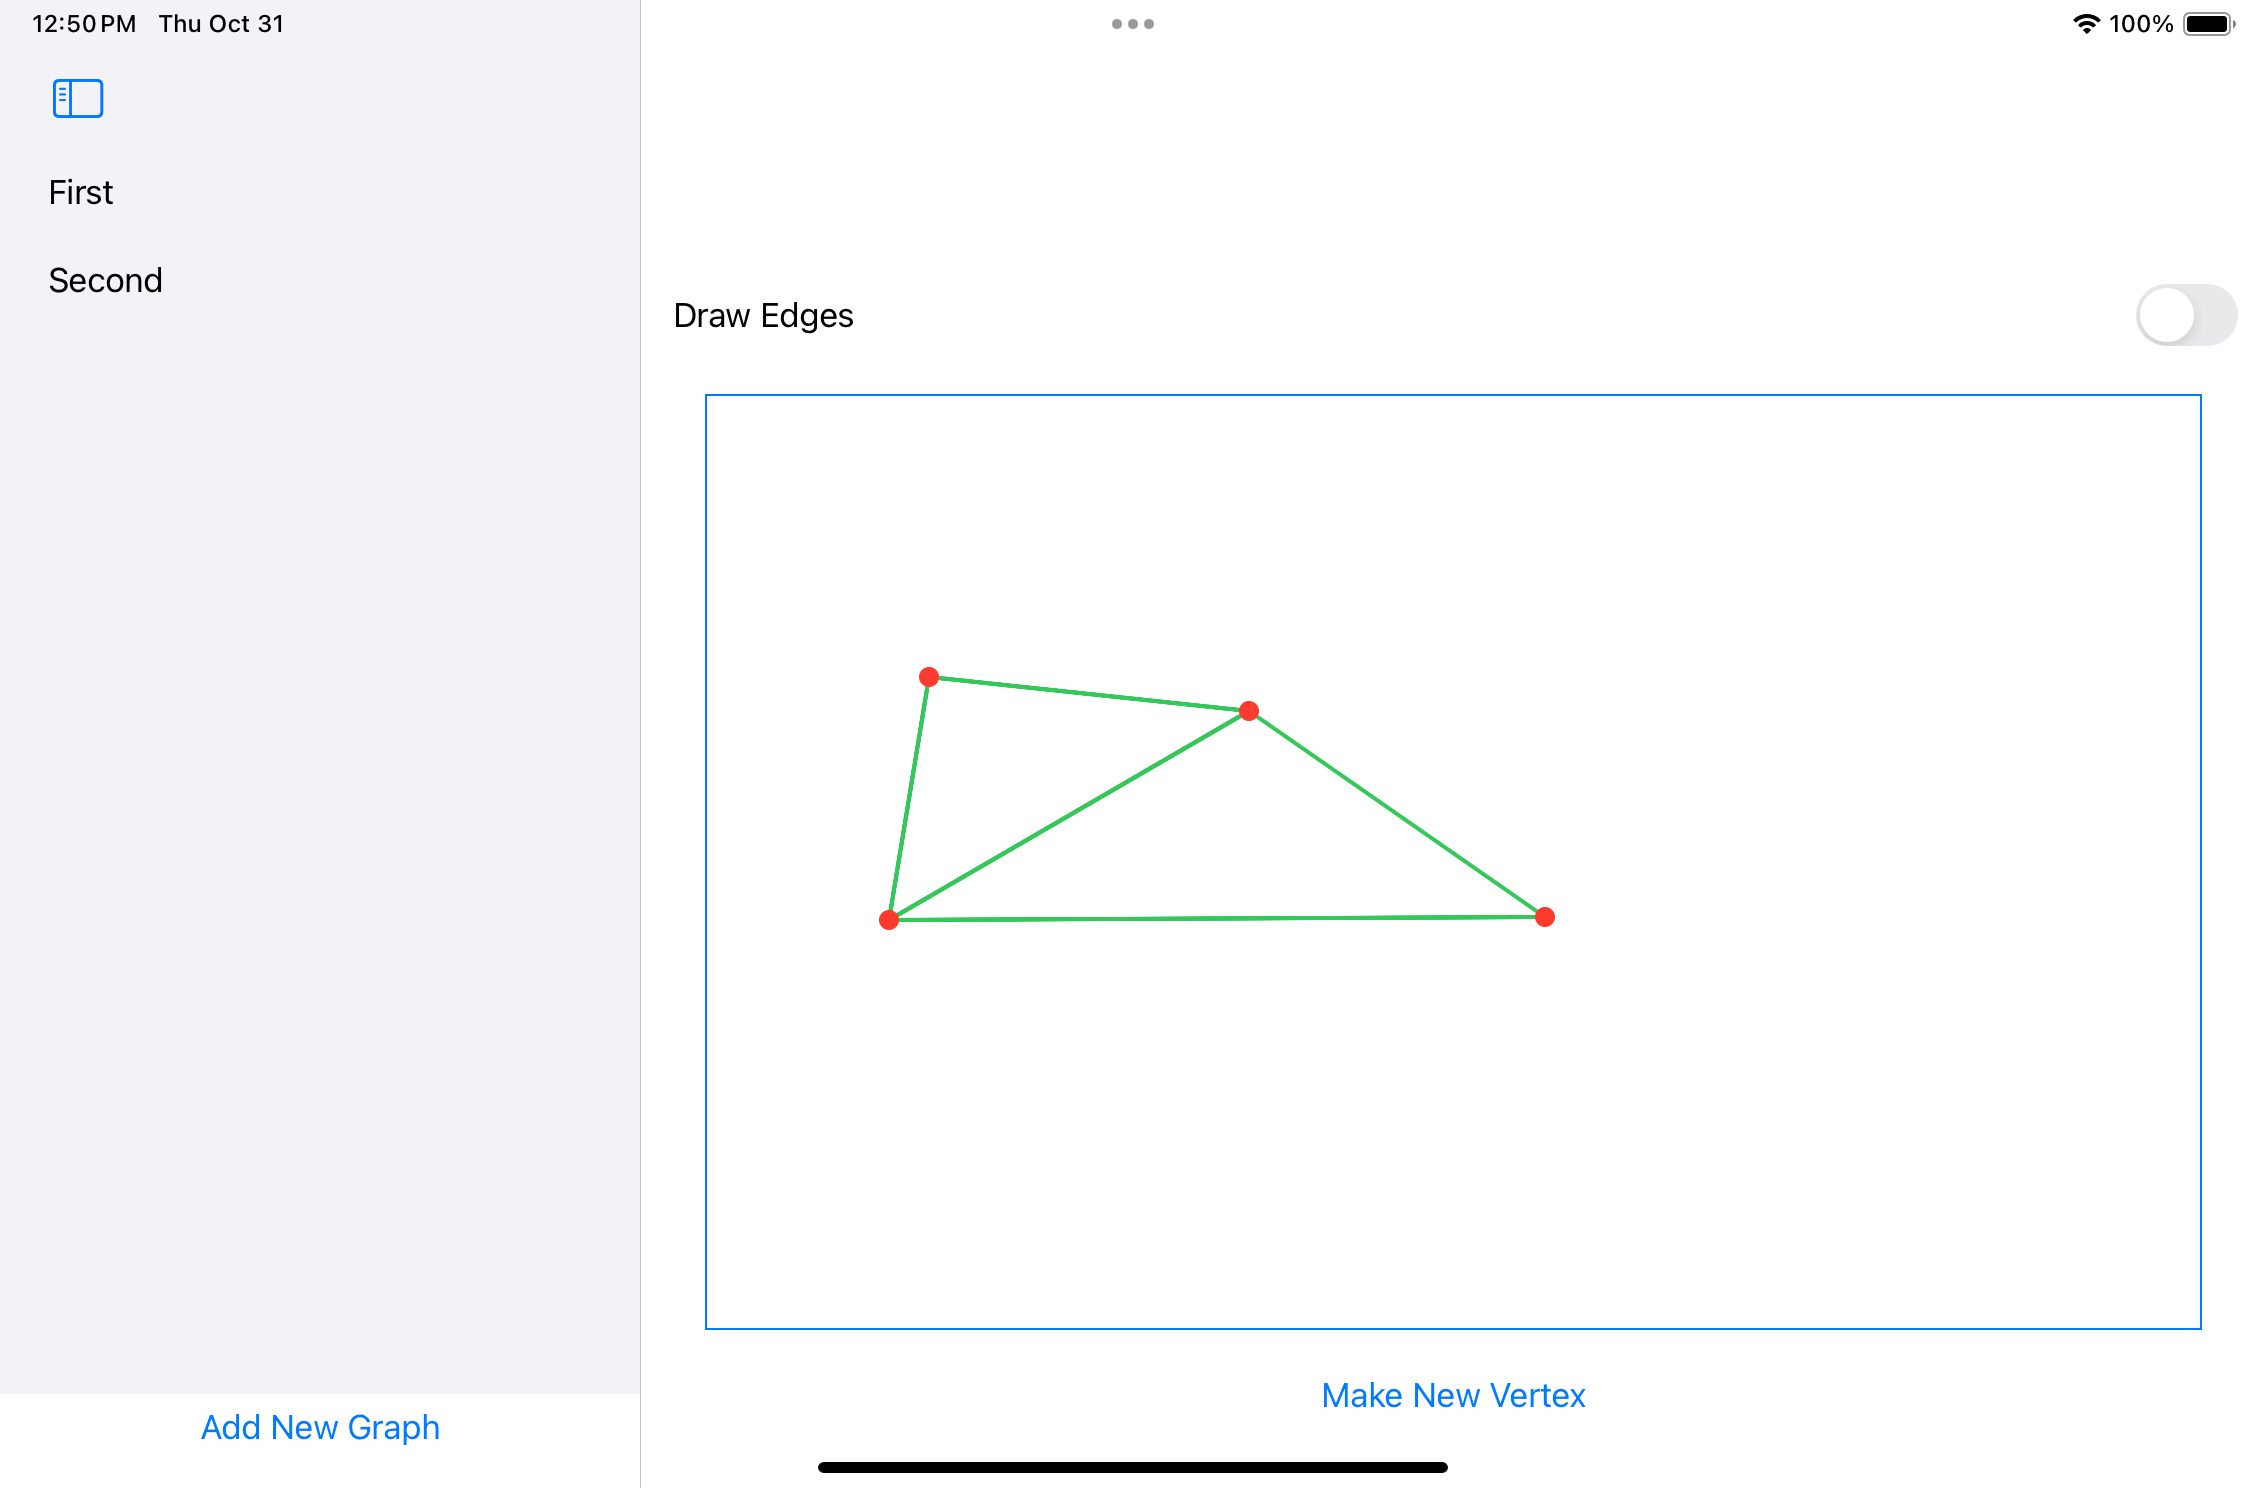
The app will add these new capabilities:
- The app will be able to store graphs in a database. This will make it possible to create an unlimited number of graph drawings.
- We are going to take full advantage of the extra space offered by the iPad display. This will enable us to both make larger drawings but also set up a navigation view off to the left that users can use to easily switch between drawings.
- We will also make the app respond gracefully to changes in orientation of the tablet.
Adding SwiftData to the app
Our first improvement is to make it easy to store our graphs in a database. We will set up a SwiftData database for this purpose.
The first change we need to make to enable this feature is to turn our Vertex and Edge classes from the last example into SwiftData model classes. We will also need to introduce a new Graph class. Here is the code for our updated classes.
import Foundation
import SwiftUI
import SwiftData

@Model
class Vertex {
    @Attribute(.unique) var id: String = UUID().uuidString
    var centerX : Float
    var centerY : Float
    let radius : Float = 5.0
    var offsetX : Float = 0.0
    var offsetY : Float = 0.0

    init(centerX : Float,centerY: Float) {
        self.centerX = centerX
        self.centerY = centerY
    }

    func getCenter() -> CGPoint {
        return CGPoint(x:CGFloat(centerX + offsetX),y:CGFloat(centerY + offsetY))
    }

    func drawIn(_ context: GraphicsContext) {
        let circle = Path(ellipseIn: CGRect(x: CGFloat(centerX + offsetX - radius), y: CGFloat(centerY + offsetY - radius), width: CGFloat(2 * radius), height: CGFloat(2 * radius)))
        context.fill(circle,with: .color(.red))
    }

    func containsPoint(_ pt : CGPoint) -> Bool {
        let deltaX = (centerX - Float(pt.x))
        let deltaY = (centerY - Float(pt.y))
        let distSquared = deltaX*deltaX + deltaY*deltaY
        if distSquared < radius*radius {
            return true
        } else {
            return false
        }
    }

    func setOffset(_ offset : CGSize) {
        self.offsetX = Float(offset.width)
        self.offsetY = Float(offset.height)
    }

    func endDrag() {
        centerX += offsetX
        centerY += offsetY
        offsetX = 0.0
        offsetY = 0.0
    }
}

@Model
class Edge {
    @Attribute(.unique) var id: String = UUID().uuidString
    var origin : Vertex
    var dest : Vertex

    init(origin: Vertex, dest: Vertex) {
        self.origin = origin
        self.dest = dest
    }

    func drawIn(_ context: GraphicsContext) {
        let edge = Path() { path in
            path.move(to: origin.getCenter())
            path.addLine(to: dest.getCenter())
        }
        context.stroke(edge,with:.color(.green),lineWidth:2)
    }
}

@Model
class Graph {
    @Attribute(.unique) var id: String = UUID().uuidString
    var name : String
    var created : Date
    var vertices : [Vertex]
    var edges : [Edge]
    var dragging : Vertex?
    var started : Bool = false

    init(name: String,created: Date) {
        self.name = name
        self.created = created
        vertices = []
        edges = []
    }

    func makeVertex(_ center : CGPoint) {
        let v = Vertex(centerX: Float(center.x), centerY: Float(center.y))
        vertices.append(v)
    }

    func startDrag(_ pt : CGPoint) {
        started = true
        for v in vertices {
            if v.containsPoint(pt) {
                dragging = v
            }
        }
    }

    func continueDrag(_ offset : CGSize) {
        if let s = dragging {
            s.setOffset(offset)
        }
    }

    func endDrag() {
        if let s = dragging {
            s.endDrag()
        }
        dragging = nil
        started = false
    }

    func endDraw(_ pt : CGPoint) {
        for v in vertices {
            if v.containsPoint(pt) && (v !== dragging) {
                if let start = dragging {
                    let newEdge = Edge(origin:start,dest:v)
                    edges.append(newEdge)
                }
                break
            }
        }
        started = false
        dragging = nil
    }
}
Here are some things to note about this new code:
- To set up our classes for SwiftData I have added @Model annotations and equipped each class with an id member.
- Some of the logic that used to live in the view model in the last version has migrated over to the new Graph class.
- I had to update some of the member variables in the Vertex class. Some of the data types I used for those member variables in the previous version (CGPoint, CGFloat, and CGSize) do not play well with SwiftData. To work around this I had to revert to using plain Float data types for some of the member variables in the Vertex class.
- Changing the member variables in the Vertex class will impact some of the drawing code. If you look at the
drawIn()methods in the Vertex and Edge classes you will see how I handle that. - Since we now have a Graph class we will no longer need a separate view model class. Instead, we will be pulling Graph objects from the database and working directly with them.
Working with a NavigationSplitView
To take full advantage of the iPad platform we are going to be working with a new top level component that is well-suited to the platform. The top level component in our app is going to be a NavigationSplitView. Here are the key features of that component:
- A NavigationSplitView contains two sub-views: a list view and a detail view.
- NavigationSplitView also helps us with navigation. The list view will display a list of graphs, and clicking on one of those graphs in the list will cause us to navigate to that graph in the detail view.
- The NavigationSplitView is also adapts nicely to different configurations. Although the app is designed to be run on an iPad in landscape orientation, if the user rotates the iPad to potrait orientation or runs the app on an iPhone the view will adapt gracefully.
Here is the code for our top level view:
struct ContentView: View {
    @Environment(\.modelContext) private var modelContext
    @Query private var graphs: [Graph]
    @State var selected : Graph?
    @State var showInput = false
    @State var graphName = ""

    var body: some View {
        NavigationSplitView {
            VStack {
                List {
                    ForEach(graphs) { graph in
                        Text(graph.name)
                            .onTapGesture {
                                selected = graph
                            }
                    }
                }
                Button("Add New Graph") {
                    showInput = true
                }.alert("New Graph", isPresented: $showInput, actions: {
                    TextField("Graph Name", text: $graphName)
                    Button("Create", action: {addItem()})
                    Button("Cancel", role: .cancel, action: {})
                }, message: {
                    Text("Enter a name for the new graph.")
                })
            }
        } detail: {
            if let g = selected {
                GraphDetailView(graph:g)
            } else
            {
                Text("Select an item")
            }
        }
    }

    func addItem() {
        let newGraph = Graph(name:graphName,created:Date())
        modelContext.insert(newGraph)
    }
}
The NavigationSplitView has both a body section and a detail section. The list view goes in the body and the detail view goes in the detail section. Our navigation strategy here is a simple one. I simply added a state variable to the view that keeps track of which Graph the user has selected. In the list view I simply added a tap gesture recognizer to each Graph in the list that will mark that Graph as the selected Graph when the user taps on it. The logic in the detail section simply displays a GraphDetailView for the currently selected Graph.
In addition to the list of Graphs, the list view also includes a button that the user can click to create a new Graph. I have attached an alert to that button that will prompt the user to enter a name for the new Graph and then add that Graph to the database. Adding a new Graph to the database also automatically updates the list of all Graphs in the view.
The GraphDetailView
The GraphDetailView contains code that I ported over from the ContentView in the previous version. The only important change I needed to make to the code was to replace the view model class from the previous version with a Graph object. The rest of the logic for this component is largely unchanged from the previous version.
One small change that I added to take advantage of the iPad platform was a frame modifier that I added to the Canvas component in this version:
.frame(maxWidth:1000,maxHeight: 1000)
I intentionally made the Canvas component very large. Since the Canvas is going to appear in the detail section of the NavigationSplitView. If we ask for a frame on the Canvas that is too big to fit in the detail section SwiftUI will automatically scale the Canvas to make it fit into the detail pane nicely.