What is SwiftUI?
SwiftUI is a framework for constructing user interfaces for iOS apps. SwiftUI is Apple's most modern UI framework, released in 2018. SwiftUI uses a declarative coding style in which we write code that sets up the user interface and the logic to respond to user actions.
Our first SwiftUI project
To get started using SwiftUI, start up Xcode and select the new project option from the welcome screen.
The next screen you will see will prompt you for the project type.
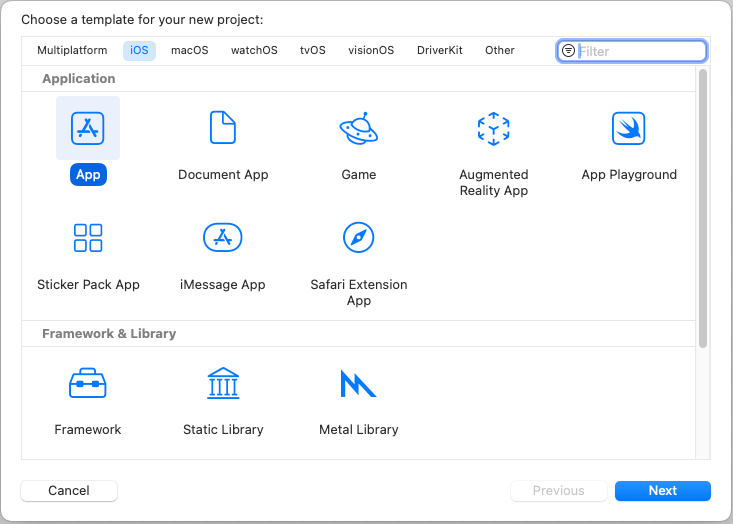
Make sure that the iOS tab is selected at the top, and then select the App project type from the Application category.
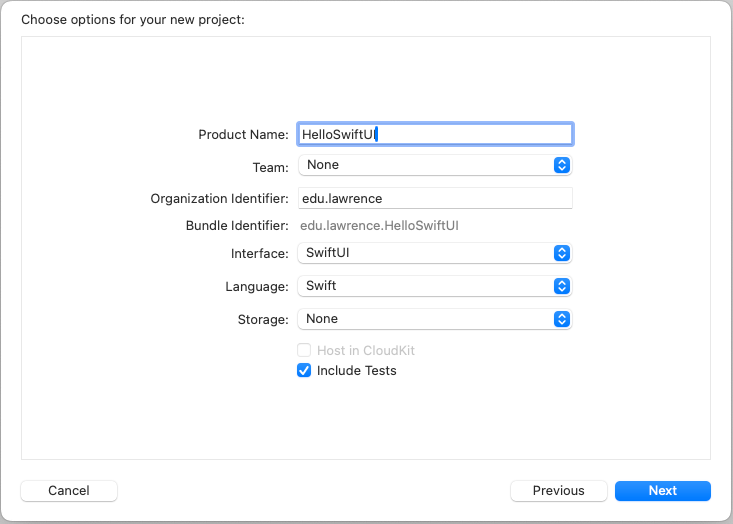
Fill in the next screen as shown below. Make sure that you select "SwiftUI" as the Interface type and Swift as the language for the project.
When the project opens you will see the code for the app's view class:
import SwiftUI

struct ContentView: View {
    var body: some View {
        VStack {
            Image(systemName: "globe")
                .imageScale(.large)
                .foregroundStyle(.tint)
            Text("Hello, world!")
        }
        .padding()
    }
}

#Preview {
    ContentView()
}
Here are some things to note about this code:
- The app's view is represented by a struct,
ContentView, that inherits from the SwiftUI View struct. - SwiftUI views are expected to have a
bodyproperty. This is a computed property: the code to compute the body for the view appears in the curly braces. - The code for the body property is expected to construct and return a single view object. In this example that view object is a VStack object, which acts as a container for an Image object and a Text object that displays the "Hello, World!" message.
- Often when construct interface elements we will apply various modifiers to the object to change its appearance or behavior. In this example, several modifiers have been applied to the Image and the VStack.
- The code above also includes code at the bottom to set up a Preview. The preview allows you to see a graphical preview of your user interface as you write the code.
- The code for this example is complete. You can click the run button in Xcode right away to load and run the app in the emulator.
Styling elements
For our next example I am going to show how to apply styles to elements. In this example we are going to display a single piece of text using the Text() function. The Text() function puts text in our view, but also returns a reference to the newly created SwiftUI text element. To apply styles to the text we can call various on the text element.
import SwiftUI

struct ContentView: View {
    var body: some View {
        VStack {
            Text("Hello, SwiftUI!")
                .font(.title)
                .padding(.all,20)
                .background(.green)
        }
        .padding()
    }
}

#Preview {
    ContentView()
}
In the code above I have adjusted the font size used for the text element, added an additional 20 pixels of padding around the text, and set the background color for the text element to green.
More complete documentation on all of the modifiers you can apply to text is available in the SwiftUI developer guide.
Implementing interactivity
For our last example today I am going to construct a simple "Hello, World" application in SwiftUI that includes several elements in the user interface, including a button with an associated action.
Here is the complete code for that example.
import SwiftUI

struct ContentView: View {
    @State var greeting : String = "Hello"

    var body: some View {
        VStack {
            Button("Greet Me") {
                greeting = "Hello, World!"
            }.buttonStyle(.borderedProminent)
            Spacer()
            Text(greeting)
            Spacer()
        }
    }
}

#Preview {
    ContentView()
}
This example is the first to make use of a @State variable. State variables are fundamental to SwiftUI in that SwiftUI watches these special variables for changes. Whenever the value of a state variable gets updated SwiftUI will automatically rerender the view.
Here are some things to notice about this code:
- The body property should always return a single view object. If you want to have multiple objects in your view you should put those objects in a single container view that holds all the objects. In this example I am using a VStack, which is a vertical stack view that holds everything else.
- Inside the VStack we construct a sequence of interface elements. Here we have a button, a text label, and a couple of spacers.
- The button has some text that it displays and some code in curly braces that serves as the action method for the button.
- Both the button's action code and the text label interact with a property of the view, the
greetingproperty. This property is annotated with the@Stateproperty modifier. If you attach this modifier to a property and subsequently change the value of the property, the view will get rebuilt. - Instead of using some text for the text label that displays the greeting, we pass the greeting property to the label instead. This will guarantee that whenever the view gets rebuilt the label will always display the current value of that property.
Here again is part of the code for the button:
Button("Greet Me") {
    greeting = "Hello, World!"
}
The code in the curly braces is actually code for a closure. This closure is essentially an anonymous function that the system will execute when the user clicks on the button. The closure in this example is what is know as a trailing closure: the code above is actually equivalent to this code:
Button("Greet Me",{greeting = "Hello, World!"})
This code sets up a closure and passes it as the second parameter to an initializer for the button.