Putting your project on the Internet
In the previous lecture I discussed how you can set up your own server to serve Spring Boot applications with Tomcat. The next step beyond that is using a hosting provider to serve your application. One of the most popular ways to host Spring Boot applications on the Internet is to use Amazon Web Services.
You can sign up for a free AWS account by going to aws.amazon.com/free.
To demonstrate how to host a Spring Boot application on AWS I went through the process to set up our Auction example on AWS. The notes below will walk you through the complete process I used to do that.
Log in to the console
Once you have an AWS account set up you can log in to your AWS Console. In the top left corner of the window you will see a Services button and a search box. You can use these to search for the services you will need along the way.
Security settings
The first thing you will need to do is to set up some security options on your account. Type IAM into the search box to go to the IAM Dashboard.
Right now the dashboard shows you have 0 user groups and 0 users created.
Click on User groups tab on the left. In User groups click Create group button to create a new group. Name the new group 'admin'. Next, in the Attach permissions policies section type s3 in the search box and then click on the check box next to AmazonS3FullAccess. Then click Create group to create the group.
Click on the Users tab on the left. Click the Create user button. Name the new user and then add this user to the admin group.
Create an RSD instance
Next you will set up an RDS instance to host your MySQL database.
Type RDS in the search box and select the Aurora and RDS service.
On the dashboard page for this service click the databases link on the left sidebar. We are going to set up a MySQL database for our project. Click the create database button and select the Full configuration option.to make a new RDS database.
Follow these steps to set up your database:
- Select MySQL as the database type, and select the full configuration option.
- Click the free tier option.
- Type and confirm a master password in the Credentials Settings section.
- In the Connectivity section click yes under public access to allow public access to the database.
- Click the Create database button at the bottom.
After you create your database you will be taken back to the databases view. Wait for your database to finish being created, then click on the database you just created to go to the details page for this database.
In the security group rules section you will see a couple of entries for security group rules. One of those rules should automatically be configured to allow access from your current ip address. If your ip address changes you will need to edit this setting later.
Go back to the RDS service and click on your database in the list of databases to bring up the database details page. Click the connect using/endpoints option and copy the endpoint address to the clipboard.
Start up the MySQL workbench and click the + button on the welcome screen to make a new database connection. Paste the endpoint address into the hostname field and change the user name to 'admin'. Click the Store in Keychain... button and enter the master password you entered when setting up the database.
You can now use the workbench to set up a new database schema and import your database.
I suggest you also create a new user (the student/Cmsc250! username/password combination we have been using works well).
Click the Schema Privileges tab, then click Add Entry to grant access to all schemas. Grant the rights shown here - these are all the rights our user will need:
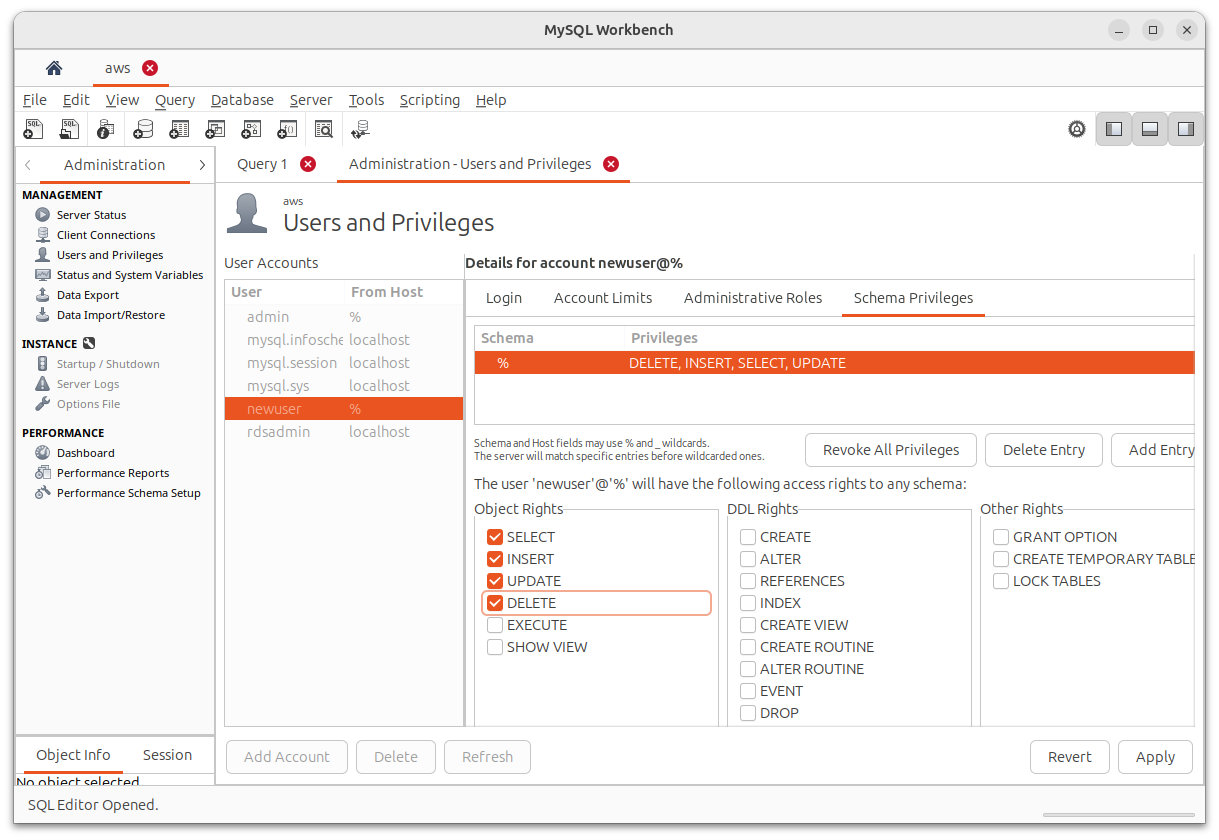
Click Apply to save your changes.
You can then use the data import screen to import the structure of the database you want to use.
Set up the jar file
Next, we will want to prepare a version of your project for deployment. Make a copy of your project and then load the project copy into Visual Studio Code.
Since we are about to deploy you can safely strip the test classes out of your project.
We will need to make one change in the application.properties file. Find the entry that specifies the database url and change localhost to the address of your RDS server.
Next, go to the pom.xml file and add the entry
<packaging>jar</packaging>
if it is not already present there.
Since we are going to be running our application on AWS with Java 21 installed, you may also want to install Java 21 on your computer and set the Java version number in your pom.xml to 21 as well.
In a terminal window run the command
mvn install
This will create a jar file for your application inside the target folder. You should rename that jar file to a simpler name.
Create an S3 bucket
Now that you have a JAR file you will need to upload it to a place where you can access it from your server later. We will use the S3 storage service to serve up the JAR file when we need it.
Back in AWS, type S3 in the search box to go to the S3 storage service.
Click the Create bucket button. Name your bucket and then create it.
Click on your bucket to view its contents. Click the upload button to upload a file and select the JAR file to upload.
Create an EC2 server
Finally, we will need to set up a server instance to host our Spring Boot application. We will use EC2 to set up our server.
Type EC2 into the search box to go to the EC2 service.
Click the Launch instance button to create a new server.
Name your server, and set the server type to Ubuntu 24.04.
In the Key pair (login) section click the Create new key pair link. Name your key pair, and select the RSA option. After creating the key pair you will get a pem file downloaded in your browser. You will need that file later if you plan to use ssh to connect to your server from your own computer.
In the networking section choose the option to edit. You will want to set the subnet for the instance to be the same subnet that your RDS database is running on. Also, add a custom security rule to allow access to port 8085 from anywhere. Also make sure that you have a security rule that allows ssh access from anywhere.
Click the Launch instance button to start up your server.
Under Next Steps you can click the Connect an RDS database button to connect the RDS database you set up earlier.
Set up the server
Once your EC2 server starts up locate it in the list of server instances and click the Connect button to connect to it. Click the EC2 Instance Connect tab and click the Connect button. This will open a terminal window in your browser that you can use to finish setting up the server.
The first thing we will need to do is to install a JRE on your server. To do this, type the commands
sudo apt update
sudo apt install openjdk-21-jre
To be able to copy your jar file from the S3 storage bucket you created earlier you will need to install the AWS CLI application. To this, run these commands:
sudo apt install unzip
curl "https://awscli.amazonaws.com/awscli-exe-linux-x86_64.zip" -o "awscliv2.zip"
unzip awscliv2.zip
sudo ./aws/install
Once the app is installed, run the command
aws configure
to configure it. You will be prompted to enter an access key. To create the access key, go to IAM in AWS and select the user you created earlier. Click the Create access key link there. Select the CLI access option and create the access key. Once the access key is created you will be able to copy the access key id and the secret access key that configure command prompts you for.
Now that you have set up access permissions you can copy the jar file from the S3 bucket you created earlier. To do this, type the command
aws s3 cp s3://<bucket-name>/<jar-name>.jar <jar-name>.jar
to download your jar file from the S3 bucket.
Launch your Spring Boot app
To start your Spring Boot server type the command
java -jar <jar-name>.jar&
This will start your server in the background.
You can now use Postman to start sending requests. Remember to replace localhost with the ip address of your server in any requests that you send.