Main Project Publisher Project
Introduction to Microservices and MongoDB
In these lecture notes I am going to introduce you to an important alternative server architecture called the microservices architecture. I will also be using today's example as an excuse to demonstrate the use of a non-relational database, MongoDB. Our textbook covers the basics of using MongoDB in chapter eight.
What are microservices?
The auction application we have been building uses a traditional monolithic architecture. A monolithic application features a single server application that handles all of the work for a system. Monolithic applications suffer from a couple of problems with scale. The first is that as our system gets more and more complex it gets ever more difficult to manage building a single large application that handles everything. The second problem is that if we run only a single copy of our server application it will struggle to manage the traffic when our number of users goes up.
The solution to both of these problems is to switch to a microservices architecture. Here are some of the key aspects of this new architectural style:
- In place of a single, large application we build a collection of smaller, more focused applications called microservices.
- Each microservice specializes in doing one thing. For example, we may construct a microservice that only interacts with a single table in the database.
- We use a communication mechanism to allow the various microservices to interact with each other. This allows one microservice to ask another microservice for information or assistance in performing a particular task.
- Each microservice is designed so that we can run multiple copies of the microservice at the same time. That way, we can distribute the client load over multiple machines instead of forcing one application running on one machine to do everything. This strategy is known as horizontal scaling.
- When a request arrives from a client it first goes to a load balancer. That application figures out which microservice to route the request to and also locates one of the microservices that can handle that request that is currently not busy. If necessary, the load balancer can launch additional copies of the microservice as the client load increases.
First steps toward a microservices architecture
As our first example of a microservice I am going to split off a part of the functionality of our original auction server and move that functionality to a microservice. That microservice will be a separate Spring Boot server, called the Publisher, that we can run at the same time as the main server.
The microservice I am going to construct will split off one essential service from the original application. That service is handling GET requests that come to the URL /auctions. Since I can anticipate that this particular request is going to be the most popular request for our system to handle, it makes sense to handle that particular request in its own separate service. Furthermore, I will construct the new server application from the ground up to enable us to run multiple copies of the service at the same time. This will make it easier to scale up our system to handle more users in the future.
Note that the new service will only handle requests to get a list of auctions. The original application will still handle everything else, including handling POST requests to post new auctions to the system. When the original system receives a request to post a new auction, it will store some limited information about that new auction in its own database, but then it will also send a message to the new service to let it know that new auction has appeared. That new service will then save a copy of the new auction in its own database.
To enable the two applications to communicate I am going to be using a message broker along with the Spring Cloud Stream module. A message broker is a separate server application that receives messages sent from applications and then distributes those messages to any application that has expressed an interest in receiving the messages. For our example I will be using the RabbitMQ message broker. The Spring Cloud Stream module is a Spring subproject that makes it easier for Spring applications to communicate with a message broker like RabbitMQ.
I am also going to using this example as an opportunity to demonstrate the use of a non-relational database. Specifically, the new microservice I am going to construct will be making use of the MongoDB database to store information about auctions. MongoDB is a what is known as a document-oriented database: this new style of database will offer us additional flexibility in storing and retrieving auctions.
Working with MongoDB
The Spring Data module that we have been using is quite flexible, and offers support for a wide range of data storage schemes. In particular, Spring Data supports the use of MongoDB in place of a traditional relational database. To use MongoDB in our microservice I need to make only a few simple changes.
First, I will need to install the MongoDB database on the same computer where I will be running the two server applications.
Next, I will need to replace the dependency on the MySQL driver and with a MongoDB dependency:
<dependency>
  <groupId>org.springframework.boot</groupId>
  <artifactId>spring-boot-starter-data-mongodb</artifactId>
</dependency>
Finally, I will also need to make a small change to the application.properties file. In place of the usual
spring.datasource.url=jdbc:mysql://localhost:3306/auction
spring.datasource.username=student
spring.datasource.password=Cmsc250!
spring.datasource.driver-class-name=com.mysql.cj.jdbc.Driver
that we use to connect to MySQL we instead will use
spring.data.mongodb.database=Auction
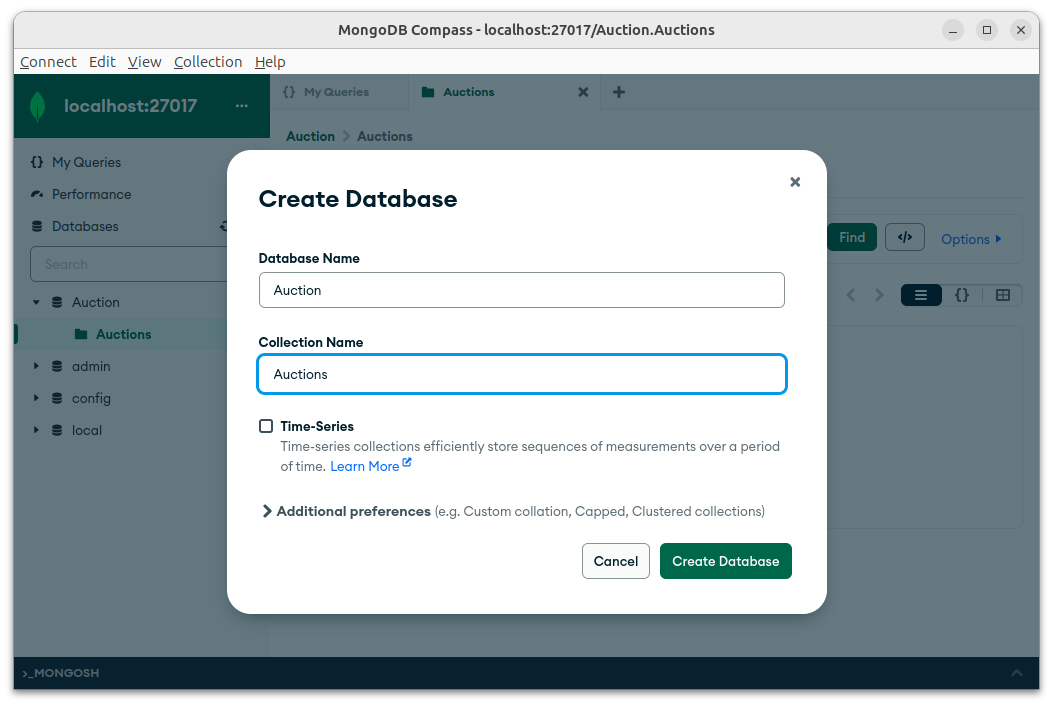
This will also require us to set up an Auction database in MongoDB. To do this we use the Compass application, which acts as the MongoDB version of the MySQL Workbench application. In Compass we set up a new database with the name 'Auction' and have it contain a single collection named 'Auctions'.
When we use MongoDB with Spring Data we also need to make a few small adjustments to our classes.
In place of Entity classes, MongoDB instead uses Document classes. Here is the Document class for Auctions:
@Document(collection="Auctions")
public class Auction {
  @Id
  private String auctionid;
  private String seller;
  private String item;
  private int reserve;
  private int highBid;
  private String opens;
  private String closes;
  private boolean completed;
  private Map<String,Object> details;

  public Auction() {}

  public Auction(AuctionDTO core) {
    this.auctionid = core.getAuctionid();
    this.seller = core.getSeller();
    this.item = core.getItem();
    this.reserve = core.getReserve();
    this.highBid = 0;
    this.opens = core.getOpens();
    this.closes = core.getCloses();
    this.completed = core.getCompleted();
    this.details = core.getDetails();
  }

  public String getAuctionid() {
    return auctionid;
  }

  public void setAuctionid(String auctionid) {
    this.auctionid = auctionid;
  }

  public String getSeller() {
    return seller;
  }

  public void setSeller(String seller) {
    this.seller = seller;
  }

  public String getItem() {
    return item;
  }

  public void setItem(String item) {
    this.item = item;
  }

  public int getReserve() {
    return reserve;
  }

  public void setReserve(int reserve) {
    this.reserve = reserve;
  }

  public int getHighBid() {
    return highBid;
  }

  public void setHighBid(int highBid) {
    this.highBid = highBid;
  }

  public String getOpens() {
    return opens;
  }

  public void setOpens(String opens) {
    this.opens = opens;
  }

  public String getCloses() {
    return closes;
  }

  public void setCloses(String closes) {
    this.closes = closes;
  }

  public boolean isCompleted() {
    return completed;
  }

  public void setCompleted(boolean completed) {
    this.completed = completed;
  }

  public Map<String, Object> getDetails() {
    return details;
  }

  public void setDetails(Map<String, Object> details) {
    this.details = details;
  }
}
This has many of the same member variables as the original Auction Entity class. Notice that since this class is designed to operate on its own in the microservice it does not contain associations to other classes. For example, in place of
@OneToOne
private User seller;
we now have simply
private String seller;
Another small change is how we set up the repositories to work with MongoDB instead of MySQL. Here is the new AuctionRepository that our microservice will use:
public interface AuctionRepository extends MongoRepository<Auction,String>{
}
Schema flexibility
One of the most interesting new features that MongoDB offers is the idea of schema flexibility. In a traditional relational database we have to start with a fixed table structure. When setting up the table of auctions in the database we had to specify a list of fields that our auctions could use and then stick to working with only those fields. In a MongoDB document collection on the other hand, we can insert documents that differ in the fields they contain. In the case of auctions, I have specified that each Auction document contains a details field which in turn will contain an object represented as a list of property/value pairs. What is interesting about the details object is that I won't specify ahead of time what properties that details object will contain. This buys us a lot of flexibility. For example, if we are setting up an auction to sell a computer the details object would look like
{ manufacturer: "Dell",
  screen_size: "16in",
  year: 2020 }
If we are setting up an auction to sell an audio CD the details object would instead look like
{ artist: "Maurizio"
  release: "M-Series",
  condition: "Very Good" }
In the Auction Document class above we implement the details member variable as a generic Map that maps String property names to Object values for those properties.
Now that we have added this flexibility to our Auction document class, we will also need to add a similar feature to our AuctionDTO class. Here is the new version of that class:
public class AuctionDTO {
  private String auctionid;
  private String seller;
  private String item;
  private int reserve;
  private String opens;
  private String closes;
  private boolean completed;

  private Map<String, Object> details;

    @JsonAnySetter
    public void setDetail(String key, Object value) {
        if (details == null) {
            details = new HashMap<>();
        }
        details.put(key, value);
    }

    @JsonAnyGetter
    public Map<String, Object> getDetails() {
        return details;
    }

  public AuctionDTO() {}

  public AuctionDTO(Auction a) {
    this.auctionid = a.getAuctionid().toString();
    this.seller = a.getSeller();
    this.item = a.getItem();
    this.reserve = a.getReserve();
    this.opens =a.getOpens();
    this.closes = a.getCloses();
    this.completed = false;
    details = a.getDetails();
  }

  public String getAuctionid() {
    return auctionid;
  }

  public void setAuctionid(String auctionid) {
    this.auctionid = auctionid;
  }

  public String getSeller() {
    return seller;
  }

  public void setSeller(String seller) {
    this.seller = seller;
  }

  public String getItem() {
    return item;
  }

  public void setItem(String item) {
    this.item = item;
  }

  public int getReserve() {
    return reserve;
  }

  public void setReserve(int reserve) {
    this.reserve = reserve;
  }

  public String getOpens() {
    return opens;
  }

  public void setOpens(String opens) {
    this.opens = opens;
  }

  public String getCloses() {
    return closes;
  }

  public void setCloses(String closes) {
    this.closes = closes;
  }

  public boolean getCompleted() {
    return completed;
  }

  public void setCompleted(boolean completed) {
    this.completed = completed;
  }
}
This flexibility now extends all the way out to the controllers where users will be posting AuctionDTOs, enabling users to post auctions for different kinds of things where the details of each auction are matched to the specific kind of thing they want to sell. We will see this in action later when it comes time to test our new system.
Working with RabbitMQ
Our new system is going to consist of the main application and this new service. To enable us to pass messages from the main system to the new application I will be using the RabbitMQ message broker. To make it easier to communicate with RabbitMQ I will be using the Spring Cloud Stream package.
To use Spring Cloud Stream I start by adding some new dependencies to both projects:
<dependency>
  <groupId>org.springframework.cloud</groupId>
  <artifactId>spring-cloud-stream</artifactId>
  <version>4.1.1</version>
</dependency>
<dependency>
  <groupId>org.springframework.cloud</groupId>
  <artifactId>spring-cloud-starter-stream-rabbit</artifactId>
  <version>4.1.1</version>
</dependency>
I am going to modify the main application to send a message to the secondary application whenever someone posts a new auction to the system.
Here is the relevant code for the AuctionController in the main system:
public class AuctionController {
  @Autowired StreamBridge bridge;

  private AuctionService auctionService;

    public AuctionController(AuctionService auctionService) {
        this.auctionService = auctionService;
    }

  @PostMapping
    public ResponseEntity<String> save(Authentication authentication,@RequestBody AuctionDTO auction) {
      AuctionUserDetails details = (AuctionUserDetails) authentication.getPrincipal();
      auction.setSeller(details.getUsername());
      String key;
    try {
      key = auctionService.save(auction);
      auction.setAuctionid(key);
      bridge.send("auctionSupplier-out-0",auction);
    } catch(WrongUserException ex) {
            return ResponseEntity.status(HttpStatus.UNAUTHORIZED).body("Bad Seller Id");
        }
        return ResponseEntity.status(HttpStatus.CREATED).body(key);
  }
}
A couple of things are new here. The first is the new member variable
@Autowired StreamBridge bridge;
The StreamBridge class is provided by Spring Cloud Stream. If offers a simple way to send messages to a message broker.
We use this new StreamBridge for one very specific thing. When a user posts a new AuctionDTO we will use the StreamBridge to send a copy of the AuctionDTO to the message broker:
bridge.send("auctionSupplier-out-0",auction);
The first parameter to the send method specifies a channel to send the message to. This particular channel is configured by some additional entries in the applications.properties file:
spring.cloud.stream.bindings.auctionSupplier-out-0.destination=auction
spring.cloud.stream.function.bindings.auctionSupplier-out-0.destination=auction
These settings say that the channel named "auctionSupplier-out-0" should send its data to the "auction" exchange in RabbitMQ. To make this work we use the RabbitMQ management console to create a new exchange of type "topic" on RabbitMQ. To access the management console we open up a browser and point it to the URL
http://localhost:15672
To make a new exchange we click the Exchanges tab, enter the details of the exchange, and then click the Add Exchange button at the bottom.
The receiving end
The messages we insert into the exchange will go to the RabbitMQ message queue. To receive those messages in the Publisher app we need to set up a Consumer bean for each type of message we plan to receive. Here is the code for a Configuration class that provides the two necessary beans:
@Configuration
public class AuctionReceiver {
  @Autowired
  AuctionService auctionService;

  @Bean
  public Consumer<AuctionDTO> readAuctions() {
    return (auction) -> { auctionService.save(auction); };
  }

  @Bean
  public Consumer<BidDTO> readBids() {
    return (bid) -> { auctionService.updateBid(bid); };
  }
}
A Consumer is a special type of function. Specifically, it will serve as a callback function for messages coming in from RabbitMQ. To hook these Consumer beans to the correct exchange we also need to provide some configuration information in the application.properties file in the Publisher project:
spring.cloud.function.definition=readAuctions;readBids
spring.cloud.stream.bindings.readAuctions-in-0.destination=auction
spring.cloud.stream.bindings.readBids-in-0.destination=bid
The first setting here tells the application to look for function beans with the given names. The second two settings automatically associate messaging channels with those functions and then link them to the auction and bid exchanges in the RabbitMQ server. Note that the naming convention here tells the system that we will be pulling data in from those two exchanges.
Listening for bids
Another feature I added to the system is the ability to display information about the current highest bid when serving up information about auctions from the Publisher application. In preparation for adding that feature I added a highBid member variable to the Auction class in the Publisher application and also added a highBid member variable to the AuctionDTO class in the Publisher application.
On the main application side I added code to publish incoming bids to the Publisher in the controller method that handles posting bids:
@PostMapping("/{id}/bids")
public ResponseEntity<String> saveBid(Authentication authentication,@PathVariable UUID id,@RequestBody BidDTO bid) {
  AuctionUserDetails details = (AuctionUserDetails) authentication.getPrincipal();
  bid.setBidder(details.getUsername());
  try {
    auctionService.saveBid(id, bid);
    bid.setAuction(id.toString());
    bridge.send("bidSupplier-out-0", bid);
  } catch(WrongAuctionException ex) {
    return ResponseEntity.status(HttpStatus.BAD_REQUEST).body("Auction does not exist");
  } catch(WrongUserException ex) {
    return ResponseEntity.status(HttpStatus.FORBIDDEN).body("User does not exist");
  }
  return ResponseEntity.status(HttpStatus.CREATED).body("Bid entered");
}
This code will send the BidDTO to the Publisher.
On the receiving end we have
@Bean
public Consumer<BidDTO> readBids() {
  return (bid) -> { auctionService.updateBid(bid); };
}
which passes the BidDTO along to this method:
public void updateBid(BidDTO bid) {
  Optional<Auction> maybeAuction = auctionRepository.findById(bid.getAuction());
  if(maybeAuction.isPresent()) {
    Auction auction = maybeAuction.get();
    if(auction.getHighBid() < bid.getBid()) {
      auction.setHighBid(bid.getBid());
      auctionRepository.save(auction);
    }
  }
}
This code looks pretty unremarkable despite the fact that the Publisher works with a MongoDB database. Since we are using Spring Data to talk to that database we end up being able to get everything done here use pretty standard Spring Data repository methods.